こんにちは。「クロジカサーバー管理」コンサルティングチームの三谷です。
この記事はAWS初心者向けAWS環境のWordPress基本パターンで紹介しているパターンの作成方法を記載しています。真似ることで、誰でもAWSを使ってWordpressの入ったタイトル通りのサーバー構成を建てる事ができます。
目次
- 1 EC2サーバー間のファイル同期
- 1.1 1.EC2サーバーをAmazon Linux 2で2つ立てます。
- 1.2 2.サーバー間のファイル同期のために両サーバーにrsync, xinetd, lsyndをインストールします。
- 1.3 3.まずは同期元と同期先を設定し、同期が行えるかどうかを確認していきます。
- 1.4 4.セキュリティグループでrsync用に873番ポートを解放し、通信先のプライベートIPアドレスを設定します。
- 1.5 5.xinetd経由でrsyncを起動するように設定します。
- 1.6 6.同期先のサーバーから同期できることを確認します。
- 1.7 7.WordPressのファイルを同期していきます。
- 1.8 8.以上の設定・確認を同期元、同期先を入れ替えて行います。
- 1.9 9.定期的にこの同期を行うようにcronで設定します。
- 2 WordPressの参照DBをRDSに設定する
- 3 ロードバランサーの設定
- 4 AZをまたいだアクセスの際の速度について
EC2サーバー間のファイル同期
1.EC2サーバーをAmazon Linux 2で2つ立てます。
立てたサーバーそれぞれにWordPress運用で必要なLAMP環境を整備します。異なるアベイラビリティーゾーンを選択するように気をつけましょう。
必要なコマンドのみ列挙しておきます。
$ ssh -i [公開鍵].pem ec2-user@[IPアドレス]
[ec2-user@ ~]$ sudo su -
[root@ ~]# amazon-linux-extras install php7.2
[root@ ~]# yum localinstall https://dev.mysql.com/get/mysql80-community-release-el7-1.noarch.rpm -y
[root@ ~]# yum-config-manager --disable mysql80-community
[root@ ~]# yum-config-manager --enable mysql57-community
[root@ ~]# yum install -y httpd php mysql-community-server
[root@ ~]# systemctl start httpd mysqld
[root@ ~]# systemctl enable mysqld httpd
Created symlink from /etc/systemd/system/multi-user.target.wants/mysqld.service to /usr/lib/systemd/system/mysqld.service.
Created symlink from /etc/systemd/system/multi-user.target.wants/httpd.service to /usr/lib/systemd/system/httpd.service.
[root@ ~]# cd /var/www/html/
[root@ html]# wget https://ja.wordpress.org/latest-ja.tar.gz
[root@ html]# tar -xzvf latest-ja.tar.gz
[root@ html]# rm latest-ja.tar.gz
ドキュメントルートを変更します。
[root@ html]# vim /etc/httpd/conf/httpd.conf
~~~~~~~~~~~~~~~~~~~~~~~~~~~~~~~~
#
# DocumentRoot: The directory out of which you will serve your
# documents. By default, all requests are taken from this directory, but
# symbolic links and aliases may be used to point to other locations.
#
DocumentRoot "/var/www/html/wordpress"
~~~~~~~~~~~~~~~~~~~~~~~~~~~~~~~~
2.サーバー間のファイル同期のために両サーバーにrsync, xinetd, lsyndをインストールします。
EPELディレクトリを利用してインストールしますが、Amazon Linux 2の場合最初はEPELディレクトリが有効になっていないので、以下のようにエラーが出ます。
[root@ ~]# yum --enablerepo=epel install rsync xinetd lsyncd
Loaded plugins: extras_suggestions, langpacks, priorities, update-motd
Error getting repository data for epel, repository not found
その場合は有効にしてあげます。
参考
[root@ ~]# yum install -y https://dl.fedoraproject.org/pub/epel/epel-release-latest-7.noarch.rpm
[root@ ~]# yum --enablerepo=epel install rsync xinetd lsyncd
~~~~~~~~~~~~~~~~~~~~~~~~~~~~~~~~
Complete!
3.まずは同期元と同期先を設定し、同期が行えるかどうかを確認していきます。
同期元のサーバーでrsyncdの設定をします。
[root@ ~]# vim /etc/rsyncd.conf
# /etc/rsyncd: configuration file for rsync daemon mode
# See rsyncd.conf man page for more options.
# configuration example:
uid = root # UID指定
gid = root # GID指定
log file = /var/log/rsyndc.log
pid file = /var/run/rsyncd.pid
host allow = [通信先プライベートIPアドレス]/32
host deny = *
read only = false
dont compress = *.*.gz *.tgz *.zip *.z *.Z *.rpm *.deb *.bz2
[module1]
comment = rsync test dir1 path = /tmp/rsync/test1/
[module2]
comment = rsync test dir2 path = /tmp/rsync/test2
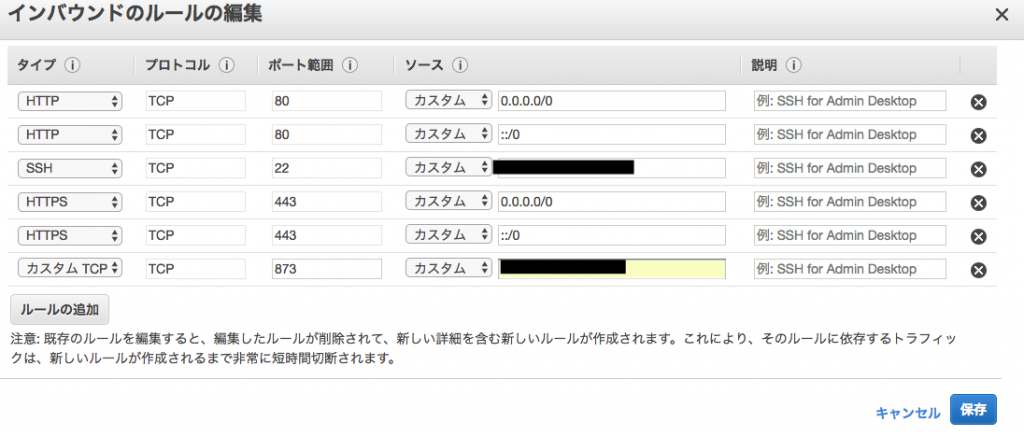
4.セキュリティグループでrsync用に873番ポートを解放し、通信先のプライベートIPアドレスを設定します。
5.xinetd経由でrsyncを起動するように設定します。
[root@ ~]# vim /etc/xinetd.d/rsync
service rsync
{
disable = no # no に変更する
flags = IPv6
socket_type = stream
wait = no
user = root
server = /usr/bin/rsync
server_args = --daemon
log_on_failure += USERID
}
[root@ ~]# systemctl enable xinetd
[root@ ~]# systemctl start xinetd.service
6.同期先のサーバーから同期できることを確認します。
[root@ ~]# cd /var/www/
[root@ www]# ll
total 0
drwxr-xr-x 2 root root 6 Jan 10 00:19 cgi-bin
drwxr-xr-x 3 root root 23 Feb 5 06:17 html
[root@ www]# rsync -avz rsync://rsync_user1@[同期元IPアドレス]/module1 /var/www/test
receiving incremental file list
created directory /var/www/test
./
test.txt
sent 46 bytes received 120 bytes 332.00 bytes/sec
total size is 13 speedup is 0.08
[root@ www]# ll
total 0
drwxr-xr-x 2 root root 6 Jan 10 00:19 cgi-bin
drwxr-xr-x 3 root root 23 Feb 5 06:17 html
drwxr-xr-x 2 root root 22 Feb 12 02:14 test
以上で同期が確認できました。
7.WordPressのファイルを同期していきます。
module1,module2を削除し以下のモジュールをrsyncの設定に追加します。
[wordpress]
comment = rsync wordpress files
path = /var/www/html/wordpress
同期先で以下のように実行します。
[root@ test]# rsync -avz rsync://rsync_user1@[同期元IPアドレス]/wordpress /var/www/html/wordpress
receiving incremental file list
./
wp-config.php
sent 261 bytes received 47,451 bytes 31,808.00 bytes/sec
total size is 41,026,205 speedup is 859.87
WordPress用のディレクトリが同期されました。
8.以上の設定・確認を同期元、同期先を入れ替えて行います。
9.定期的にこの同期を行うようにcronで設定します。
[root@ ~]# crontab -e
*/10 * * * * /usr/bin/rsync -avz rsync://rsync_user1@[同期元IPアドレス]/wordpress /var/www/html/wordpress
これで5分おきに同期が取れるようになりました。以上で2サーバー間でWordPressのファイルを同期する部分は終了です。
WordPressの参照DBをRDSに設定する
2つのサーバー上のWordPressのDBをRDSに設定します。
ロードバランサーの設定
作成した2つのサーバーにロードバランサーを設定していきます。
以上で所望のサーバー構成が完成しました。あとは、ロードバランサの部分でインスタンスへのアクセスをロードバランサからのみにしてあげれば運用可能になります。
AZをまたいだアクセスの際の速度について
アベイラリティゾーンをまたいだ通信は遅くなることが確認されています。この構成の場合は、どちらか一方のインスタンスへのアクセスだけもう片方より遅くなることが予想されるので、
速度を重視するサービスの場合はシングルサーバー、もしくは、リードレプリカを使い同一アベイラビリティゾーンに構成するのがいいでしょう。
コーポレートサイトをクラウドでセキュアに
クラウドサーバー管理
クロジカガイドブック
- コーポレートサイト構築・運用の課題を解決
- クロジカクラウドサーバー管理の主な機能
- 導入事例
- 導入までの流れ